
This post may contain affiliate links. Please read my disclosure policy.
Onigiri (おにぎり), sometimes called Omusubi (おむすび), are Japanese rice balls. They are what I call the magical food of the Japanese. Tender, toothsome rice made portable, they are the classic comfort food for picnics (especially during the cherry blossom viewing), bento lunch boxes, quick grab-and-go snacks, hiking trips, movie snacks, etc.
Growing up in Japan, I have the fondest memories of helping my mom shape freshly cooked rice into triangles and pack them neatly into my bento boxes before running off to school.

What is Onigiri (Omusubi)?
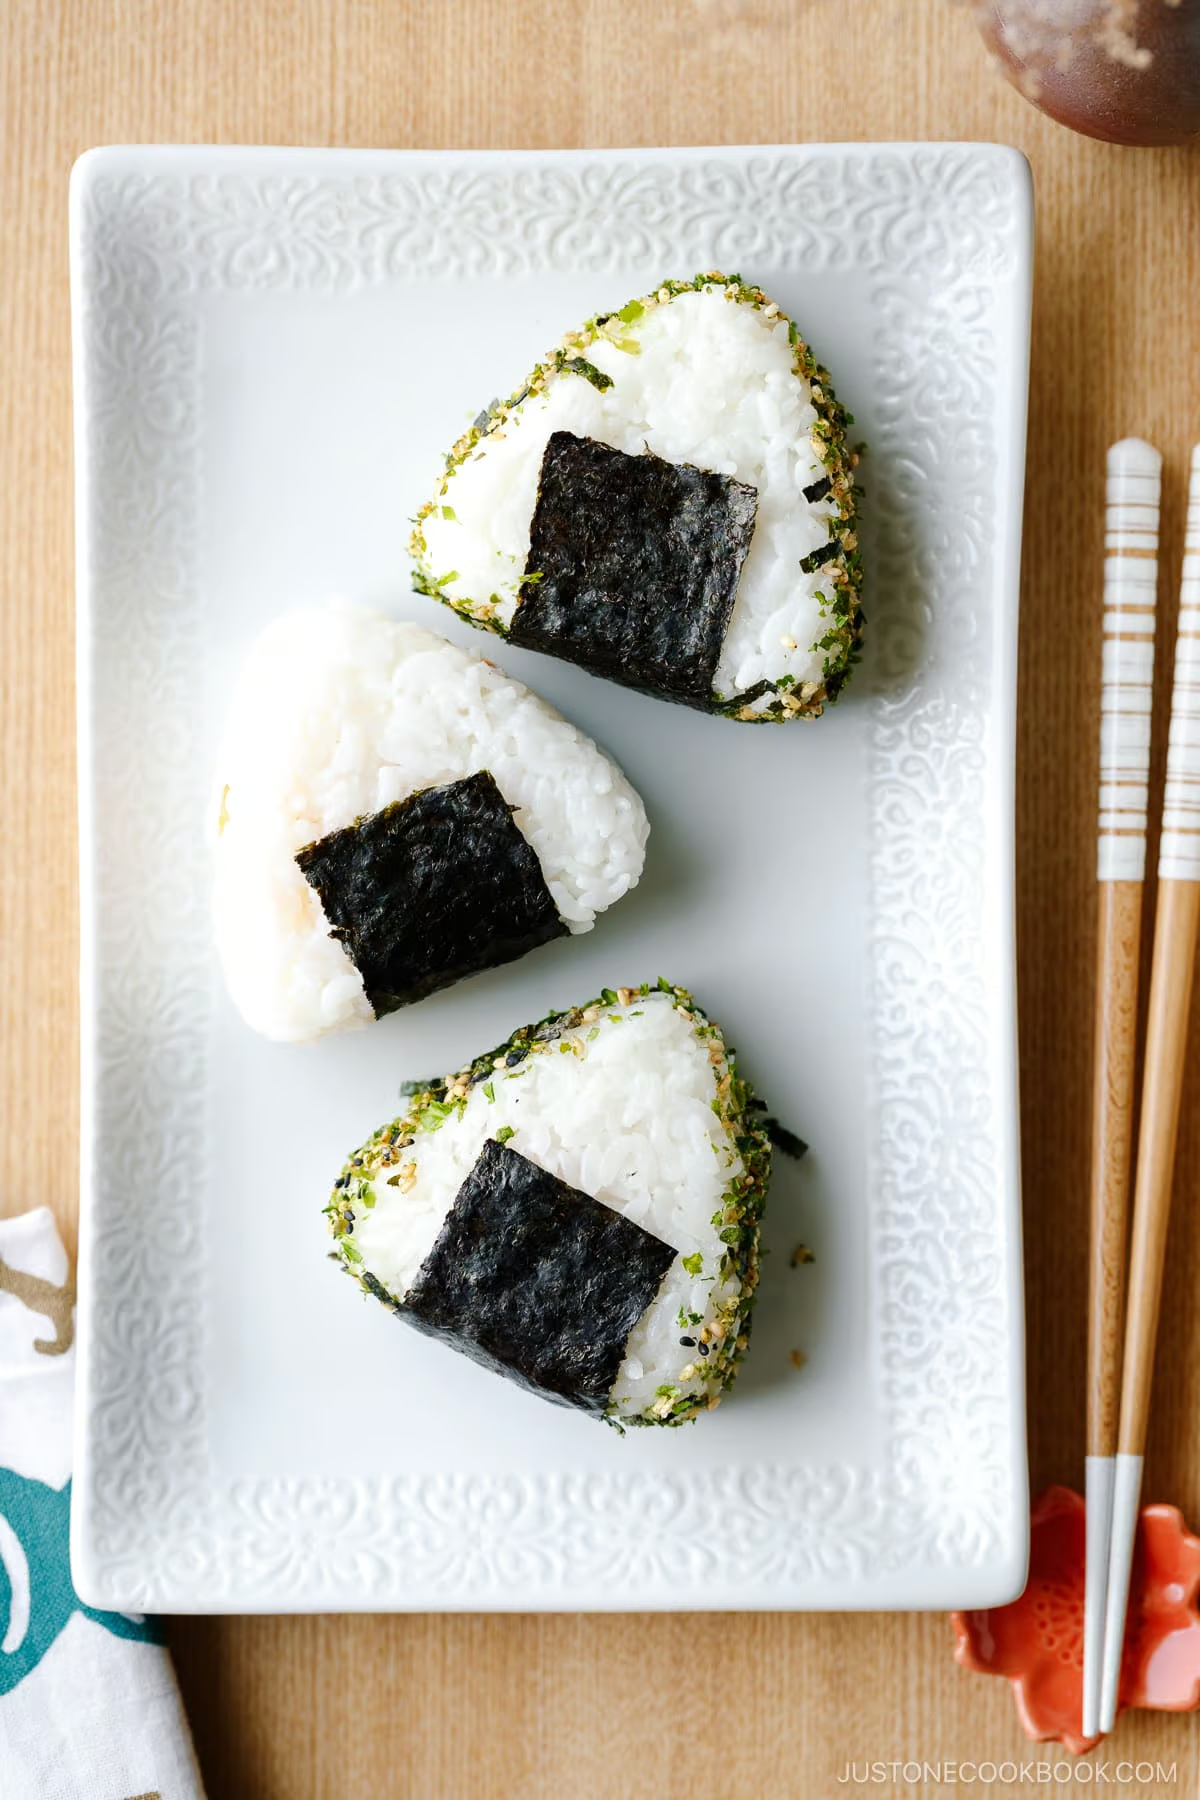
Onigiri (おにぎり) are Japanese rice balls made of steamed rice that you compress into a triangular, ball, or cylinder shape and are usually wrapped in a nori seaweed sheet. You can flavor them lightly with just salt or add a variety of fillings.
The word “onigiri” is more commonly used throughout Japan, but it’s also known as nigirimeshi (握り飯) or omusubi (おむすび).
Adored by all ages, onigiri prove their importance and popularity in Japanese everyday lives. We make rice balls for school and work lunches and for many outdoor activities and events. In some ways, they are the Japanese idea of energy bars. We snack on onigiri when we need a quick boost of energy and sustenance.

Onigiri’s History
Deemed as the very first traveling food, onigiri were invented before the existence of refrigeration as a means to preserve fresh rice longer so it could be brought along to feed travelers, samurai, soldiers on the road, or farmers in the farm fields.
The method was to fill the rice with a salty or sour ingredient as natural preservatives and lightly compact them into portable food that can be carried along and eaten with hands. To keep the rice safe, salt was first used in making the onigiri.
Today you can find these rice balls in so many varieties and forms, but the basics of making onigiri remain the same.
If you’re an anime or manga (Japanese comics) fan, you have most likely seen onigiri show up in many storylines of these cultural outputs. The most memorable appearance has to be in a scene in Spirited Away, where a boy named Haku offers Chihiro, the main character, some onigiri in the hope of comforting her. As the young girl took a bite of the rice ball, tears started rolling down her cheeks. It tells the powerful connection between food and home and the emotions involved. As you can see, onigiri means a lot to the Japanese.

Ingredients for Onigiri
For the most basic and comforting onigiri, you’ll need only two ingredients. That’s right! You need steamed rice and good-quality nori seaweed.
- Japanese Short-Grain Rice – Commonly labeled as sushi rice outside of Japan, Japanese short-grain rice is the rice that we use in most Japanese cooking. It gives you the perfect chewy, tender, and slightly sticky texture. I personally recommend Koshihikari. Please do not substitute it with jasmine or any other types of rice as they will fall apart. Wish to learn more about Japanese rice? Read this post.
- Nori Seaweed – You can find it at Japanese/Asian grocers, well-stocked grocery stores, or online.
- Optional Fillings – We’ll discuss them below.
How to Make Onigiri
- Cook short-grain rice with a rice cooker, pot over the stove, Instant Pot, or donabe.
- Using a mold or your hands, make rice balls. Don’t forget to salt rice balls for food safety. Fillings are optional and I share how to stuff rice balls with a filling in the recipe card.
- Wrap the rice ball with nori seaweed.
What is the Best Rice Cooker
To make the perfectly steamed rice for onigiri, I like to use my Zojirushi NP-NWC10XB Rice Cooker. It makes fluffy rice every time, and it’s the best Japanese rice cooker I’ve ever used! You can get it on Amazon for $458.29, and it’s well worth it if you cook a lot of rice.
Onigiri Filling
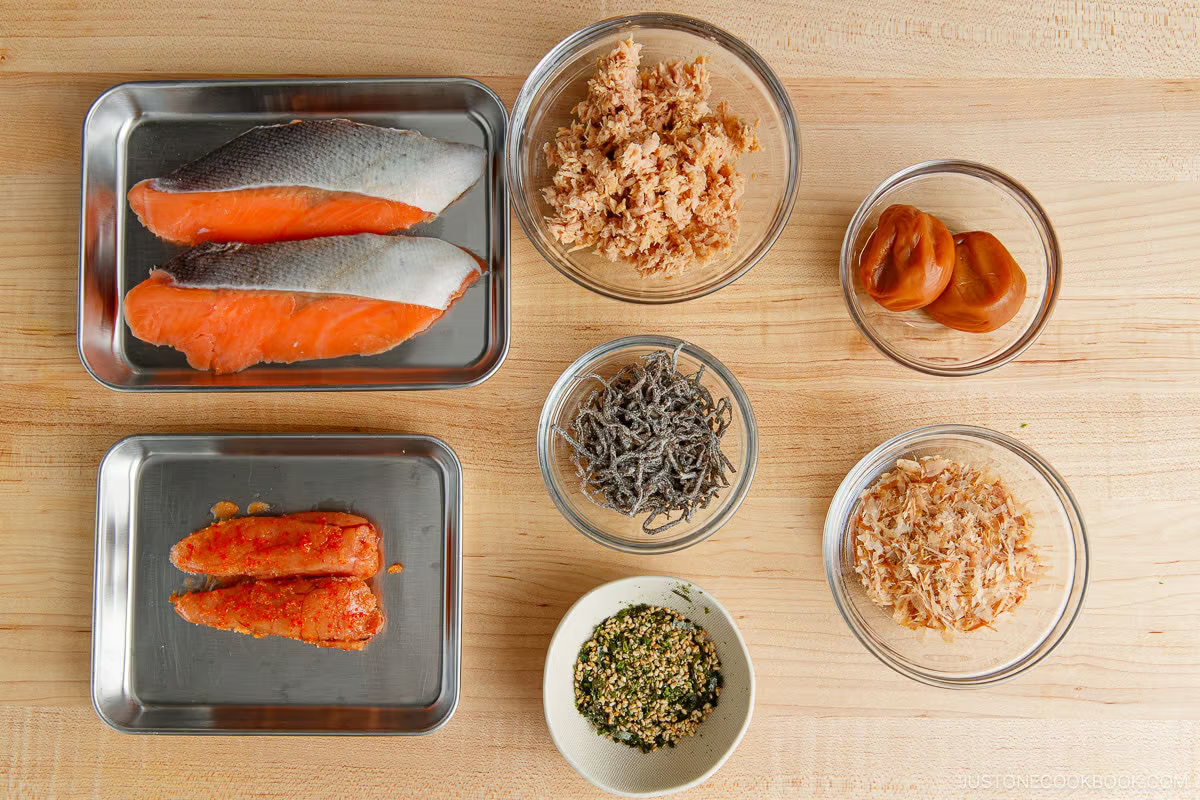
Yes, you can fill onigiri with whatever your heart desires, but I’ll share with you some of the most common fillings for onigiri in Japan.
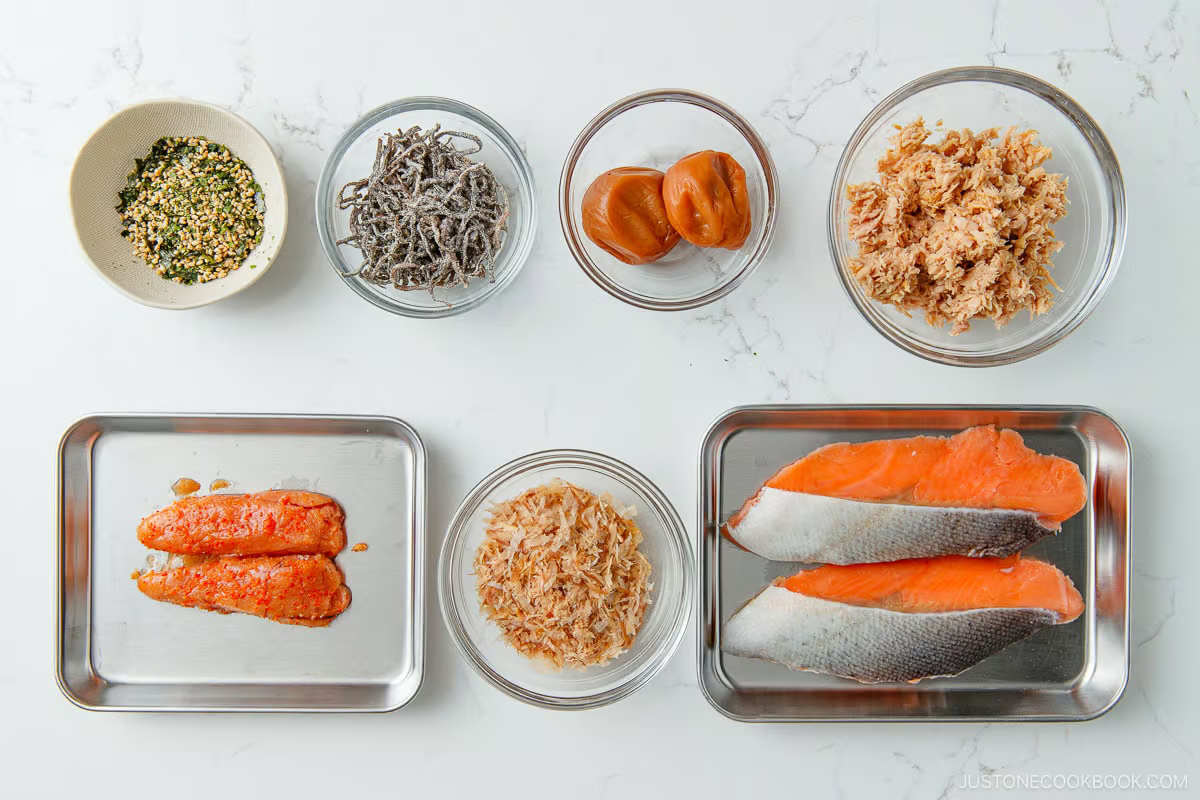
- shake [pronounced as sha-keh] (salted salmon)
- umeboshi (Japanese pickled plum)
- okaka (bonito flakes moistened with soy sauce)
- kombu (simmered kombu seaweed)
- tuna mayo (canned tuna with Japanese mayonnaise)
- mentaiko or tarako ((spicy) salted cod roe)
- furikake (rice seasonings to sprinkle all over)
Now if you are ready to get creative, look no further than your dinner leftovers. I’ve used my leftovers from Chicken Karaage and Shrimp Tempura to fill my onigiri. Instead of plain steamed rice, you can also use Takikomi Gohan (mixed rice) or Corn Rice.
Onigiri Shapes and Mold
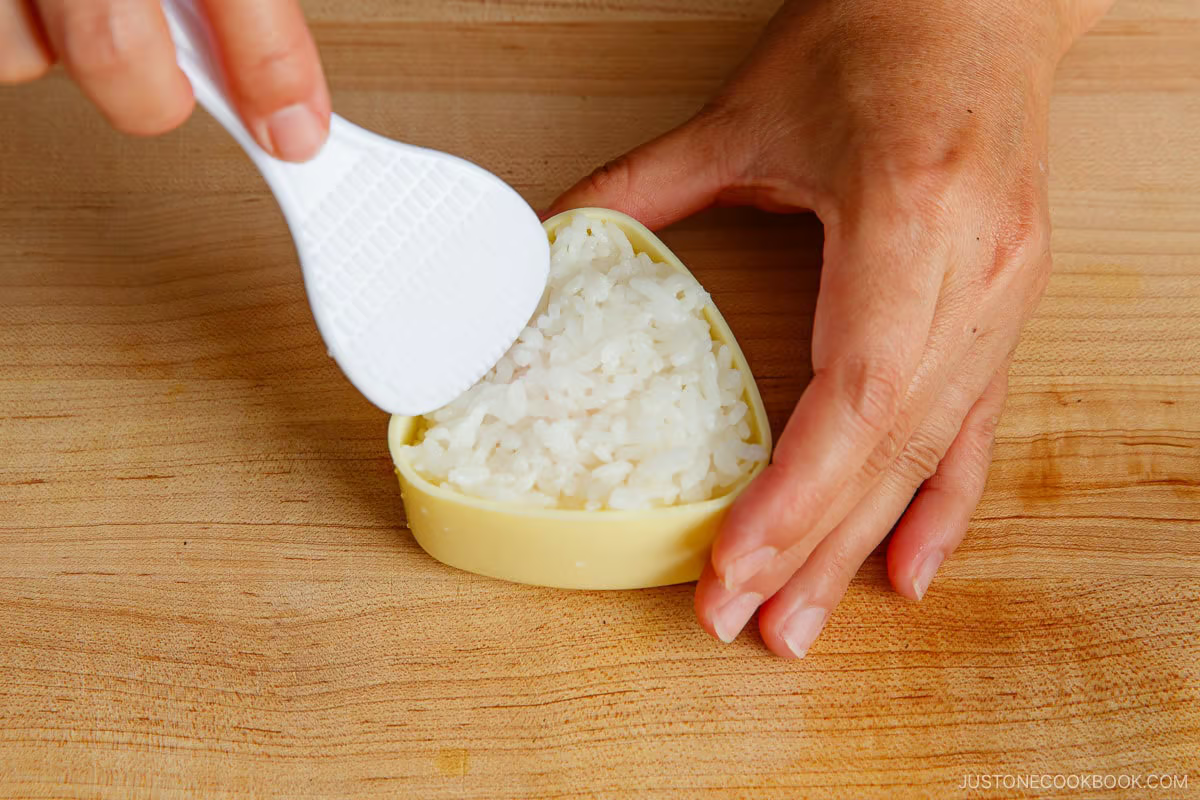
You can make many different shapes of onigiri, and the most common ones are:
- Triangular
- Cylindrical (shape of rice bale)
- Round/circular
- Cylindrical
- Creative – Some home cooks even take their onigiri to another high fashion level by shaping the rice balls into so many cute animals or character-based shapes!
In this updated recipe post, I used an onigiri mold to demonstrate how to use it. I find it easier to portion each onigiri using the mold.
How to Wrap Nori

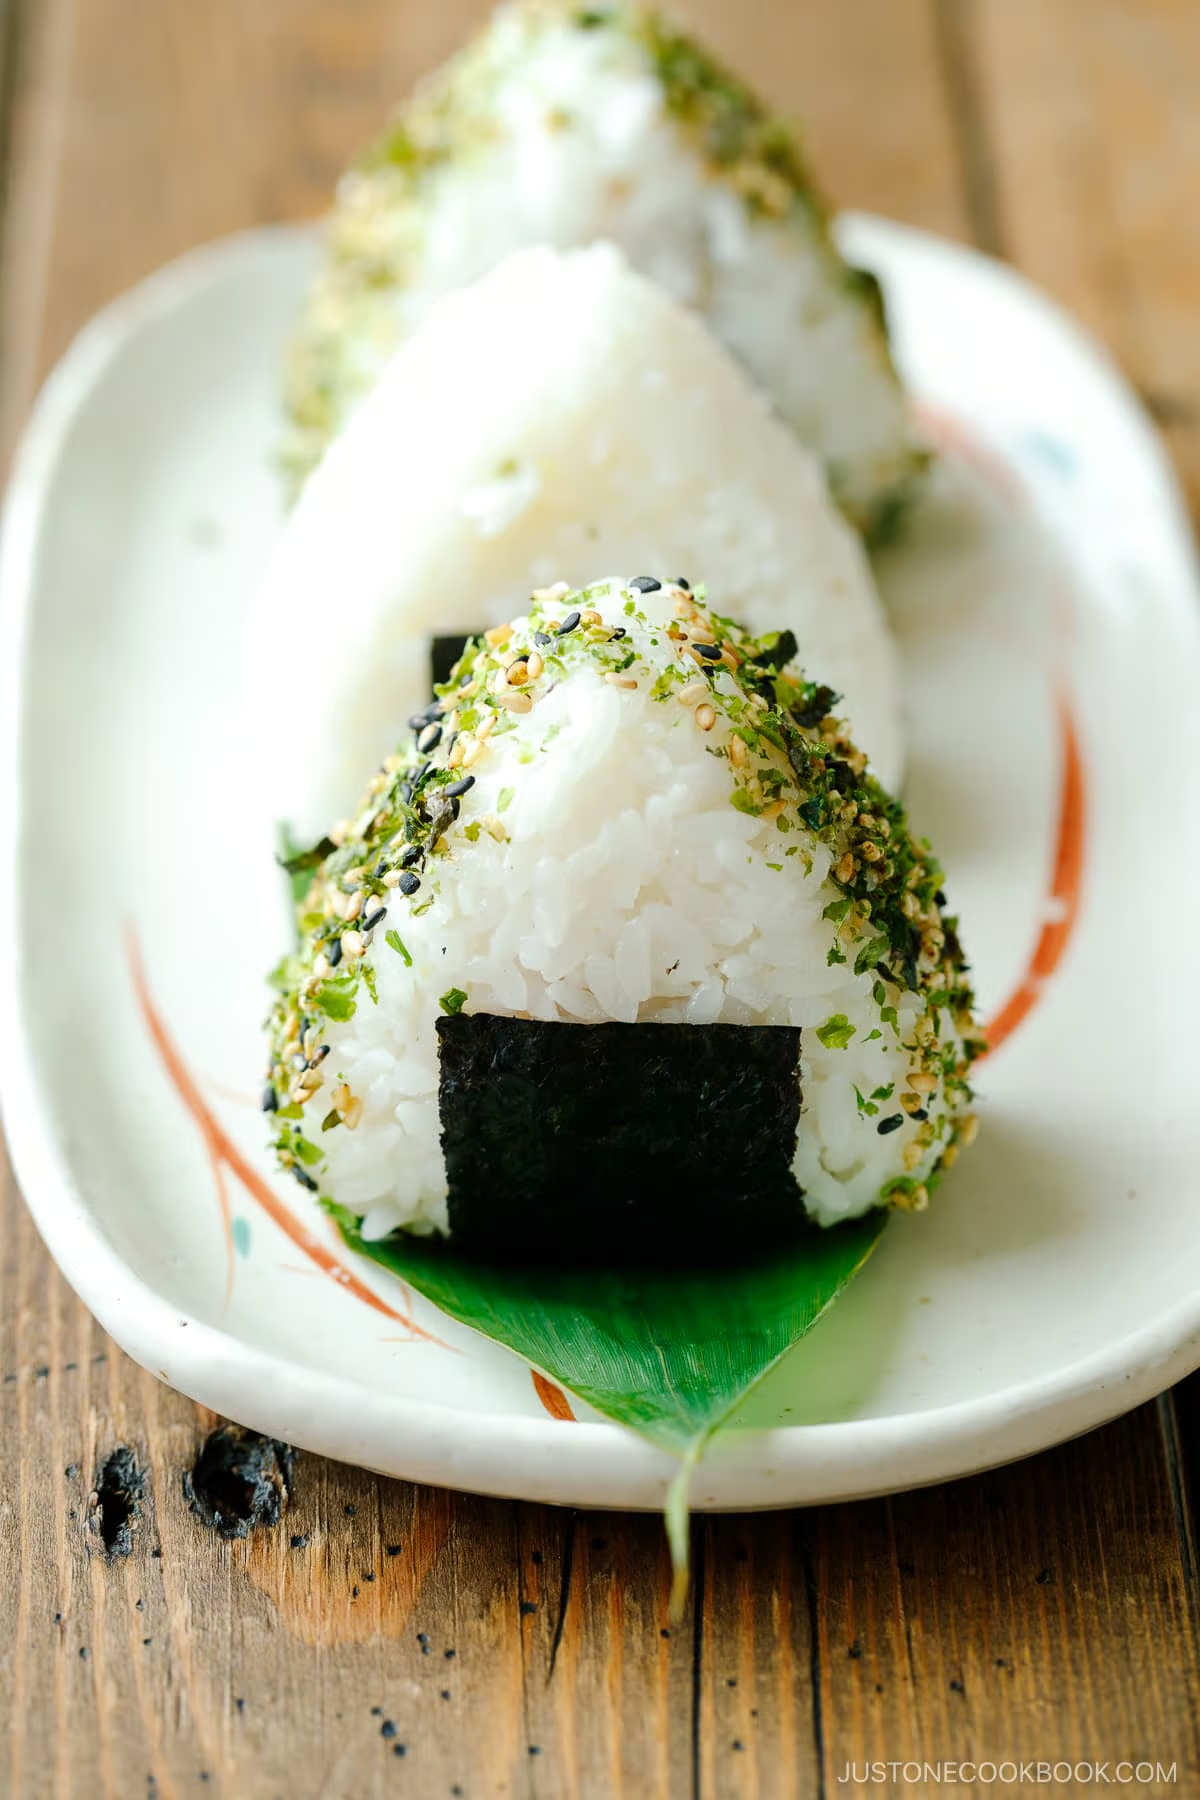
There are different ways to wrap the nori around the rice balls. You can cut a sheet of nori into thin strips and wrap the nori around the cylindrical or triangular rice ball shape (this is more like a decoration).
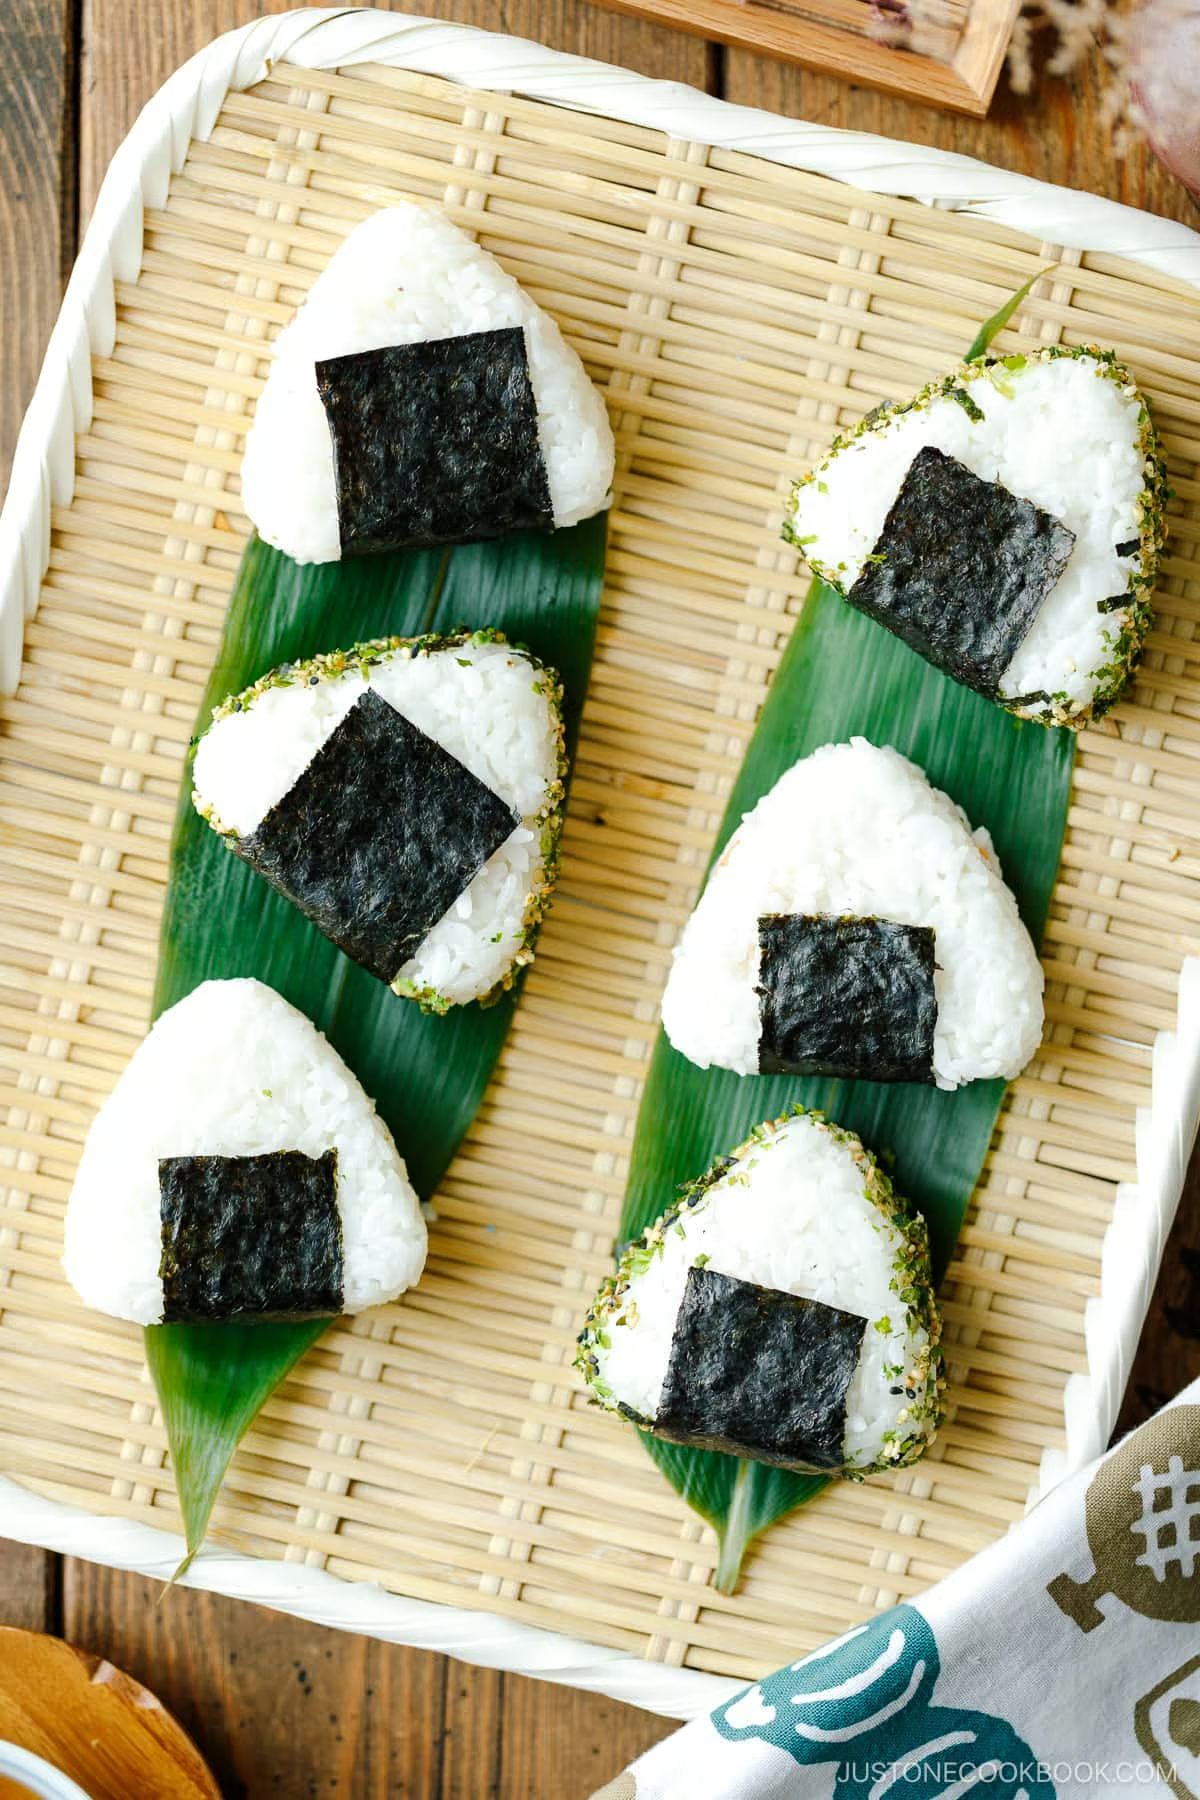
You can also cut the nori sheet in thirds and wrap the rice ball with the nori.
Some prefer to wrap the rice balls when they are warm so the nori will stick to the rice (but it will be soggy/moist) but most people prefer to keep the nori as crisp as possible.
You can buy this onigiri plastic wrapper, which allows you to keep the nori crispy until you’re ready to eat (similar to Japanese convenience store-style onigiri). Or, check the video below to see how you can make a DIY plastic wrap.
Cooking Tips and Techniques
- Use freshly cooked rice. I strongly recommend using freshly cooked rice instead of older rice when you make onigiri. Transfer the cooked rice to a large bowl, baking sheet, or sushi oke (hangiri). Let cool slightly. The rice should be warm when making onigiri.
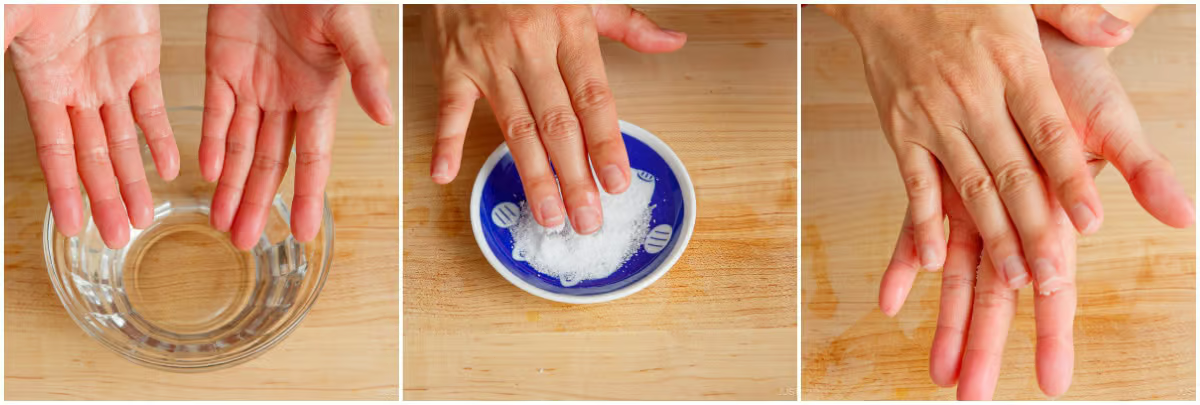
- Wet and salt your hands. It’s important to wet your hands with water to prevent the rice from sticking. Prepare a bowl of water next to your working station. Salt both your hands and rub to spread all around. Salting helps to flavor and to preserve the onigiri for a longer time.
- Give just enough pressure. Your hands should be firm enough when pressing the onigiri so the rice doesn’t fall apart when you shape it. You don’t want to squeeze the rice too tight. Rotate the rice balls every time you give gentle pressure. After rotating 3-5 times, the rice ball should be in good shape.
- Identify your rice ball with a filling. If you add a filling, place a small amount of the filling on the tip of the rice ball so you can identify which filling is inside.
- Keep the rice and rice balls covered with a plastic or a damp towel so the rice will not dry out quickly.
- Wrap the nori right before you serve, if you like your nori to be crispy. Some onigiri shops sell onigiri that has nori wrapped around it already. We enjoy both styles, so it’s up to your preference.
Frequent Asked Questions
Why does my nori get soggy and wet?
Nori gets soggy as soon as it absorbs moisture. If you prefer crispy nori for your onigiri, I recommend wrapping the nori right before you eat. Make sure the nori is kept in a resealable bag to avoid getting stale.
Why does my nori get gummy?
I recommend getting better quality nori, preferably imported from Japan. It’s very unfortunate but most nori available in grocery stores here is not flavorful and the texture tends to get gummy when wet/moist. I always get imported nori from Japan (I usually pick the most expensive nori at Nijiya Market) and it’s pretty good. We can get better quality nori in Japan at a decent price, but not outside of Japan yet.
Do I have to make onigiri right before I pack for lunch?
If you want to make onigiri for lunch the next day but don’t want to wake up early, here’s my tip. You can wrap the finished onigiri (in plastic wrap) with a thick kitchen towel. The kitchen towel protects the rice balls from being too cold in the refrigerator. Rice gets hard in the refrigerator but with this easy trick, your onigiri will be cool enough to stay safe.
Do you serve onigiri cold?
You can enjoy onigiri warm or at room temperature, so they’re perfect in your lunchbox or as a portable snack on the go. You can even plate them up as a tasty appetizer!
Do you think I can involve my children in making rice balls?
Yes! The best part about making onigiri at home is you can always engage your little ones as their ‘craft day in the kitchen.’ Make it fun and enjoyable! You can use this onigiri mold to make it easier to create a triangle shape.
Like everything else, practice makes perfect when it comes to making onigiri. For a visual guide, you can watch my video and see the step-by-step instructions below.
Is onigiri sushi?
For the uninitiated, onigiri is sometimes misunderstood as a type of sushi but they are not.
One of the key differences between onigiri and sushi is that onigiri starts from a base of plain steamed rice, while sushi is made of Sushi Rice (steamed rice seasoned with vinegar, salt, and sugar).
👉🏻 See more details in How To Cook Japanese Rice and How To Make Sushi Rice.
Where can I get onigiri?
Outside of the home, you can literally find rice balls everywhere in Japan: konbini convenience stores, airports, cute cafes, and specialty stores.
Here in the US, you can find them at Japanese grocery stores.
More Onigiri Recipes and Variations


We also enjoy onigiri in these popular variations:
- Yaki Onigiri (Grilled Rice Balls)
- Yaki Onigiri Chazuke
- Onigirazu (Rice Sandwich)
- Tenmusu (Shrimp Tempura Rice Balls)
- Salmon and Shio Kombu Onigiri
- Tuna Mayo Onigiri
Wish to learn more about Japanese cooking? Sign up for our free newsletter to receive cooking tips & recipe updates! And stay in touch with me on Facebook, Pinterest, YouTube, and Instagram.
Onigiri (Japanese Rice Balls)
Ingredients
For the Steamed Rice
- 2¼ cups uncooked Japanese short-grain white rice (3 rice cooker cups; 540 ml)
- 2½ cups water (600 ml)
For the Onigiri
For the Japanese Salted Salmon Filling (quick version)
- 1–2 fillet salmon
- Diamond Crystal kosher salt
For the Okaka Filling
- 1 packet katsuobushi (dried bonito flakes) (one packet is typically 3 g or 5 g)
- 1 Tbsp soy sauce
For the Tuna Mayo Filling
- 1 (5-ounce) can albacore tuna (preferably packed in olive oil)
- 2 Tbsp Japanese Kewpie mayonnaise
- ½ Tbsp soy sauce
For the Other Fillings
- 2 umeboshi (Japanese pickled plum)
- 2 sacs spicy salted pollock roe or cod roe (karashi mentaiko)
- shio kombu (prepared)
- furikake (rice seasoning)
Instructions
To Prepare the Steamed Rice
- To measure 2¼ cups uncooked Japanese short-grain white rice, overfill a US cup measure (a ¾-cup measure works well for this) or a rice cooker cup with uncooked short-grain rice and level it off. Put the rice in a large bowl. Repeat until you have the amount of rice you need. Tip: Please note that 2¼ cups (450 g, 3 rice cooker cups) of uncooked Japanese short-grain rice yield 6⅔ cups (990 g) of cooked white rice. This is enough for 9 onigiri rice balls (typically 110 g each). One cup of cooked white rice weighs about 5.3 oz (150 g).

- Next, rinse and wash the short-grain white rice and cook it with a rice cooker, pot over a stove, Instant Pot, or donabe. Please follow the detailed instructions in any one of these posts for how to rinse and cook the rice. Here, I‘m adding 2½ cups water to the drained rice in a rice cooker. Tip: The rice-to-water ratio is 1 to 1.1 (or 1.2) for Japanese short-grain white rice. This rice requires a soaking time of 20–30 minutes. Please read this blog post for a detailed explanation.

To Prepare the Onigiri Fillings
- While the rice is cooking, let‘s prepare the ingredients for the fillings.
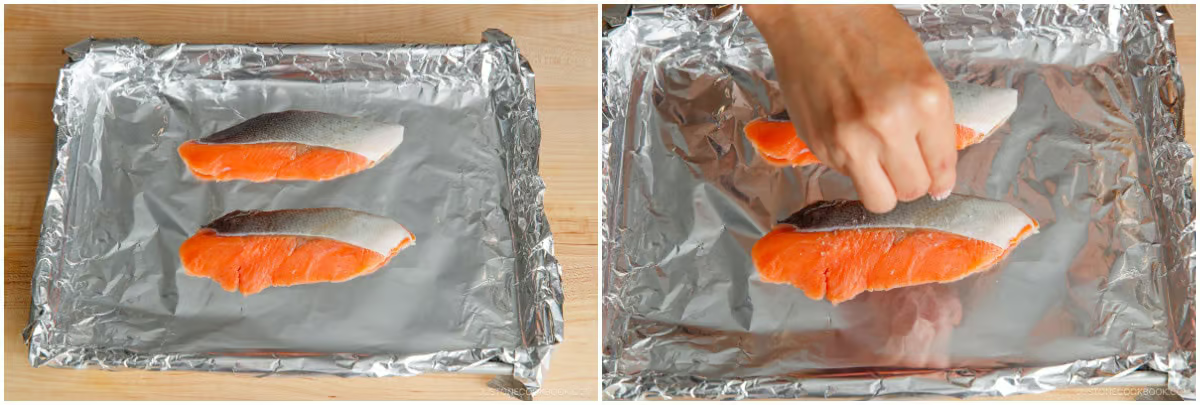
- Japanese Salted Salmon Filling: Place 1–2 fillet salmon on a baking sheet lined with aluminum foil (for broiling) or parchment paper (for baking). Sprinkle Diamond Crystal kosher salt on both sides. Tip: This is a quick version of salted salmon; for the traditional method, see my Japanese Salted Salmon recipe.
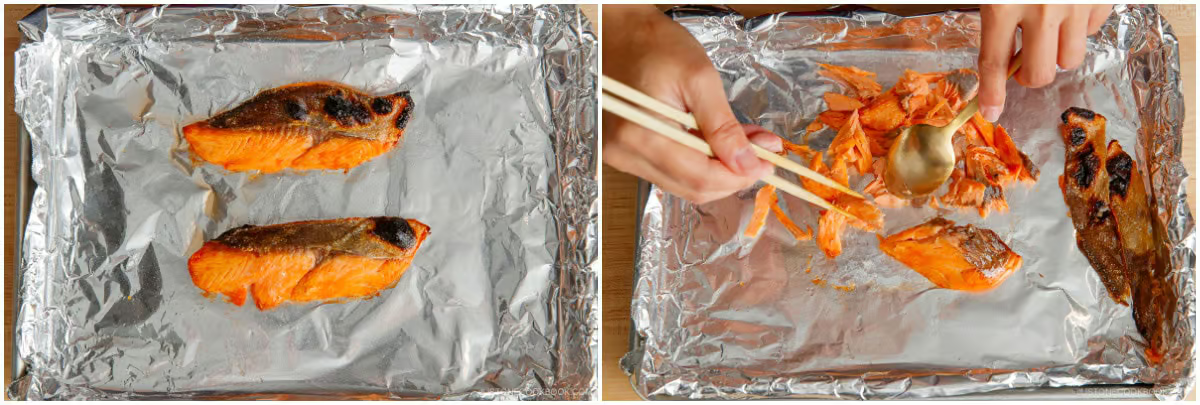
- Broil or bake at 425ºF (218ºC) in a toaster oven or standard oven for 10–20 minutes. Japanese salted salmon is cooked until well done (you want it dry and flaky). Break the cooked salmon into flakes and set aside.
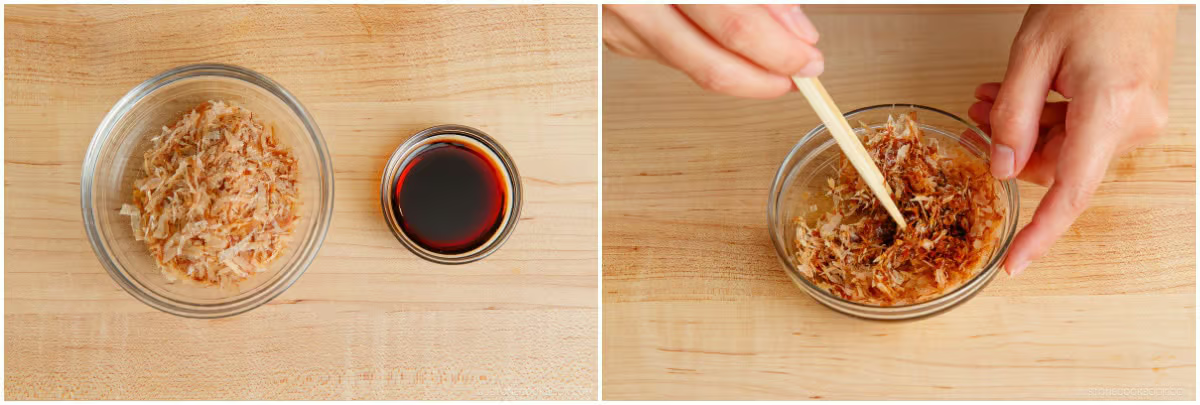
- Okaka Filling: Put 1 packet katsuobushi (dried bonito flakes) in a bowl and add 1 Tbsp soy sauce. Mix to combine. The katsuobushi should be moistened but not drenched in the soy sauce.
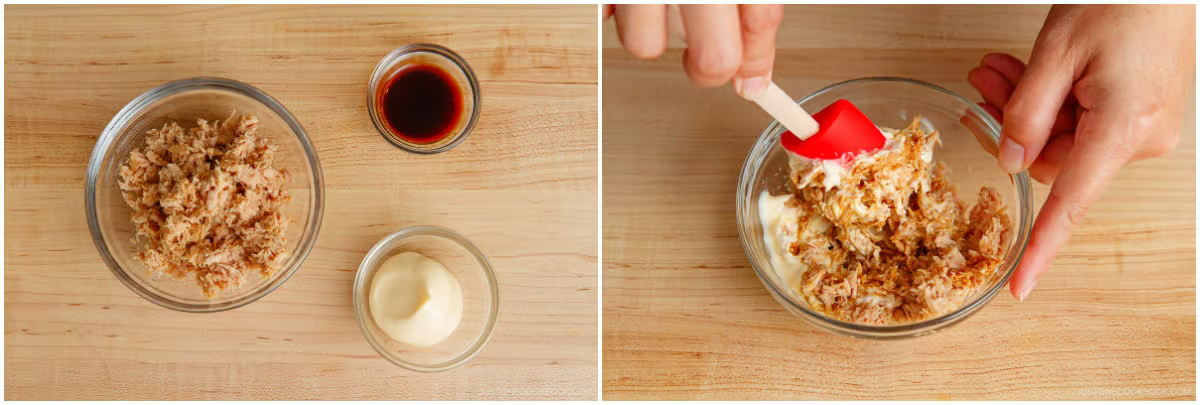
- Tuna Mayo Filling: Put 1 (5-ounce) can albacore tuna (preferably packed in olive oil), drained, in a bowl. Add 2 Tbsp Japanese Kewpie mayonnaise and ½ Tbsp soy sauce. Mix to combine.
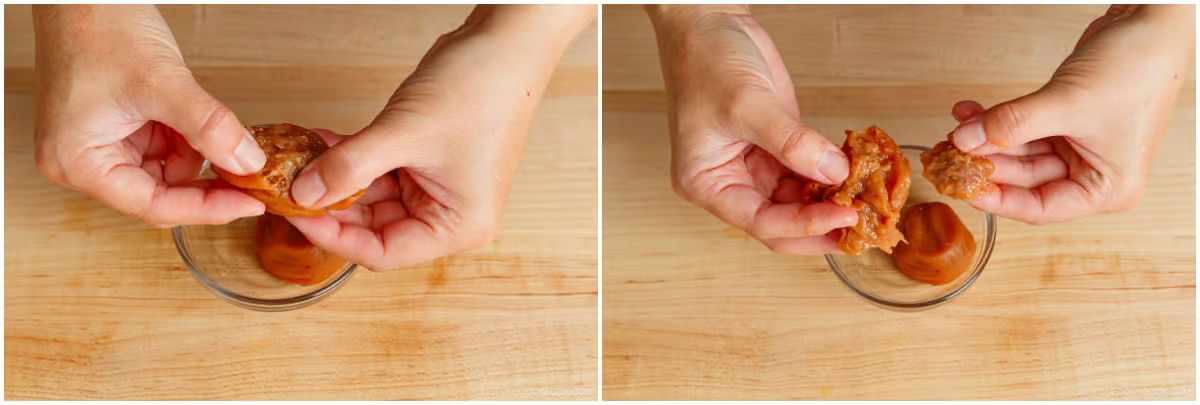
- Umeboshi Filling: Remove and discard the seed from 2 umeboshi (Japanese pickled plum) and put the umeboshi flesh on a small plate or bowl.
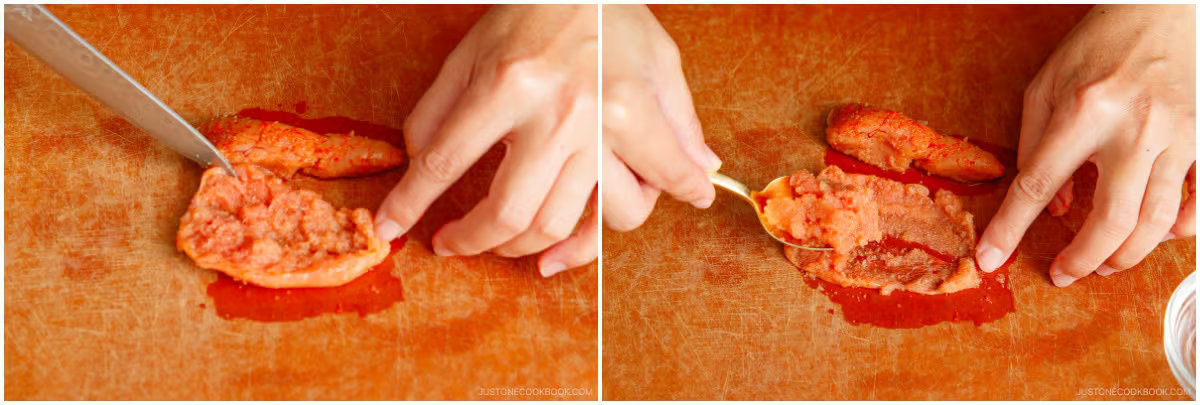
- Mentaiko Filling: Cut 2 sacs spicy salted pollock roe or cod roe (karashi mentaiko) in half and squeeze out the roe from the sacs with your hands or a knife. Set aside on a small plate or bowl.Shio Kombu Filling: Put the prepared shio kombu in a bowl for easy access later.
To Shape the Onigiri
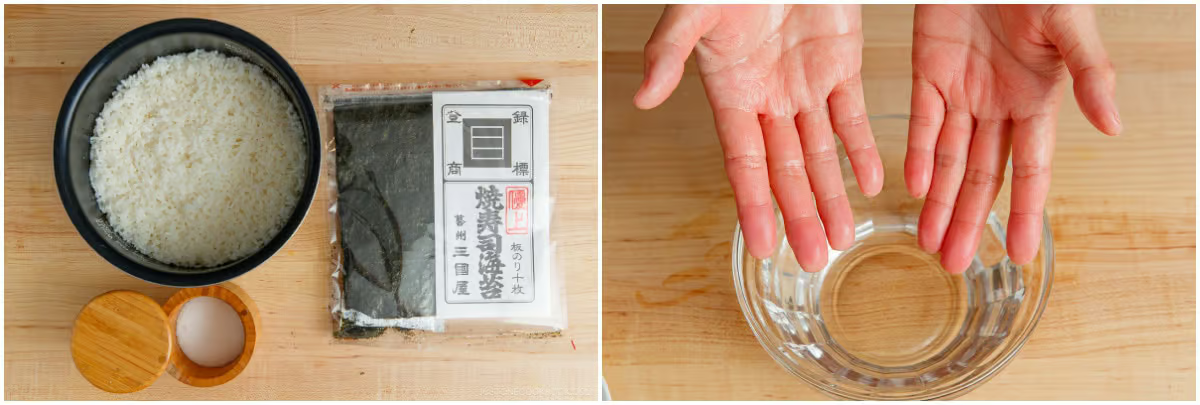
- Gather all the ingredients to make the onigiri and a bowl filled with water for your hands. If you are shaping the onigiri with your hands, transfer the freshly cooked rice to a large bowl, baking sheet, or sushi oke (hangiri) and let it cool slightly until it‘s cool enough to handle. The rice should be warm when making onigiri.
Method 1: With an Onigiri Mold
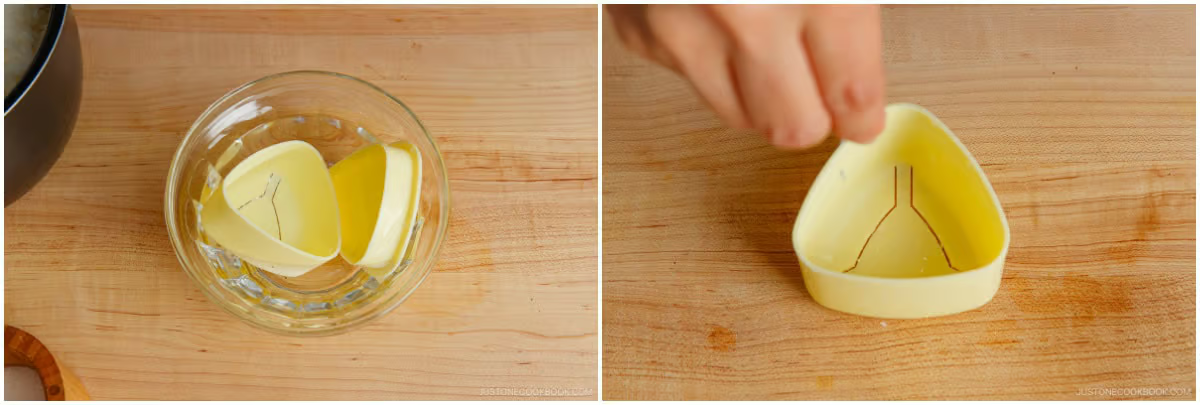
- Prepare another bowl filled with water. Soak the onigiri mold and lid in the water to moisten so the rice doesn‘t stick to it. Remove the mold and drain the excess water. Next, sprinkle salt in the moistened mold. Salt is used not only for seasoning but also for food safety.
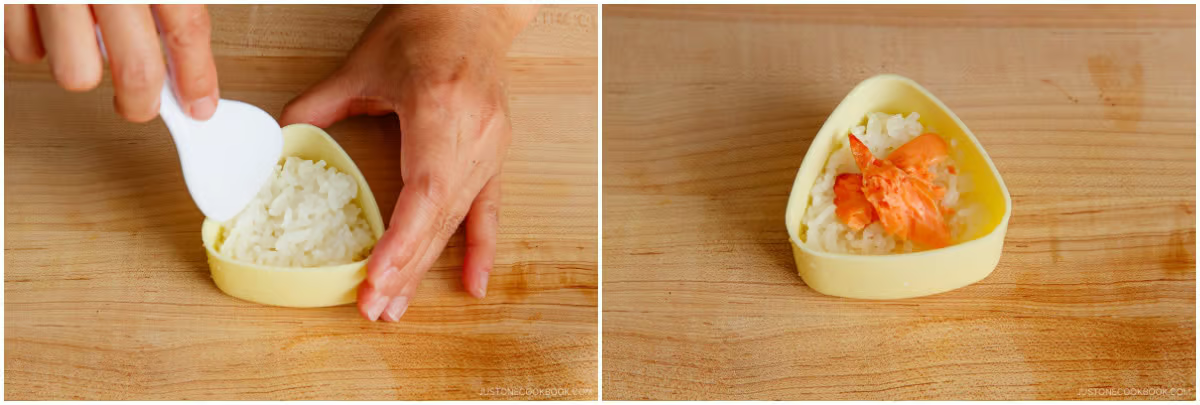
- Fill it halfway with warm rice, making sure the rice is filled to the corners. Add a spoonful of your filling of choice.
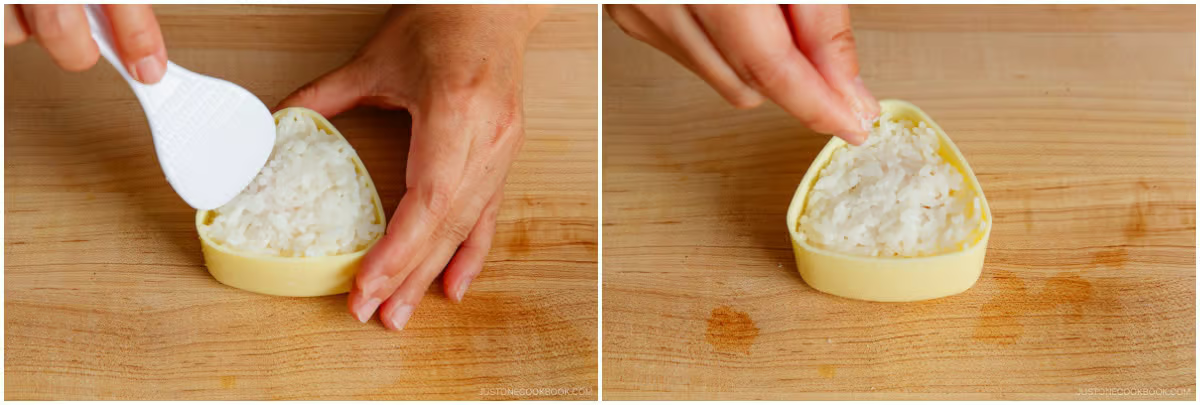
- Fill the rest of the mold with more rice, all the way to the edges. Sprinkle the top of the rice with more salt.
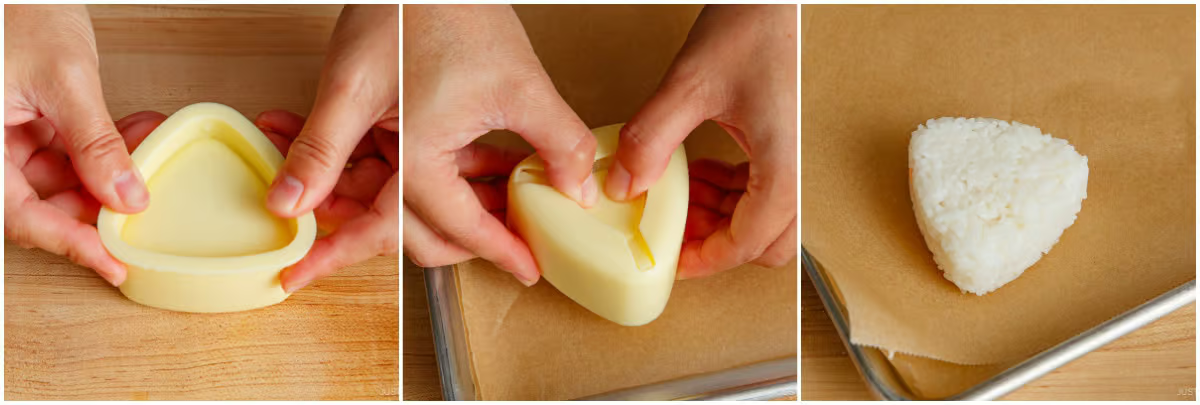
- Cover with the lid and push down firmly. You should feel a slight resistance to it; if not, you may want to add a bit more rice. Remove the lid, flip the mold over, and push the “button” to release your onigiri onto a baking sheet or plate lined with parchment paper. Repeat with the remaining rice. Tip: Always dip your fingers in water before touching the onigiri to prevent the rice from sticking to your fingers.
Method 2: With Your Hands
- First, wet both of your palms with a bit of water to prevent the rice from sticking to your hands. Then, apply some Diamond Crystal kosher salt and spread it on both palms. How much salt? I dip 2–3 fingers in the kosher salt, as pictured below. If you are using table salt, use half the amount as it’s saltier than kosher salt.
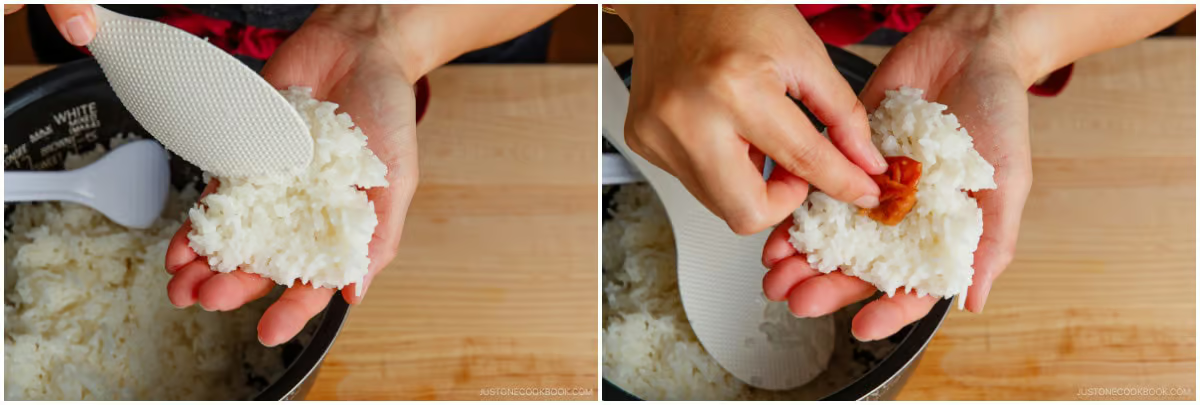
- Scoop a handful (about ⅓ cup, 50 g) of slightly cooled but still hot rice onto your left (non-dominant) hand. Tip: Your left hand holds the rice ball and flattens the onigiri’s sides. Always keep it underneath the onigiri. Create a small well (indentation) in the center of the rice. Add 1–2 tsp of one kind of filling inside.
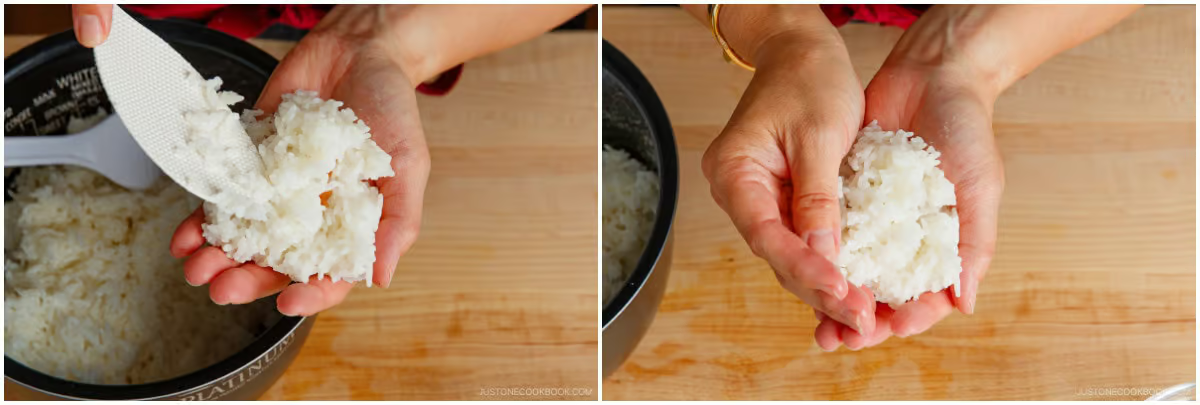
- Scoop some more rice (another ⅓ cup, 50 g) to cover your filling completely. Mold the rice with your hands and gently press the rice around the filling to form the rice into a ball.
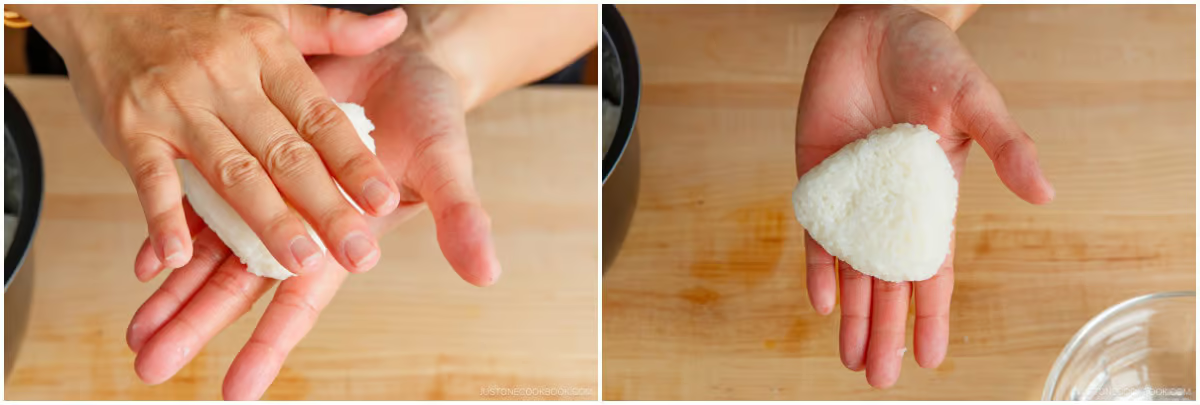
- Bend your right (dominant) hand slightly to form a “mountain” shape and place it on top of the rice. Your right hand forms the triangle corners of the onigiri. Always keep it on top of the rice ball.Gently press the rice with your top hand to make a triangle corner. Tip: Make your hands just firm enough so the onigiri doesn’t fall apart, but don’t squeeze too tightly. Try to keep the density of the rice ball as airy as possible.At the same time, squeeze the fingers and heel of your bottom (left) hand on either side of the onigiri to gently press the sides flat.Now, rotate the triangle corner you just made toward you. I use a single upward motion to barely toss the rice ball in my bottom hand while I use my top hand to rotate it toward me clockwise (since I’m right-handed). The first corner will now point at you while the tip of the second corner points up.Repeat the “press and rotate” steps to form the second and third triangle corners. Then press and rotate 2–3 more times to finish shaping the triangle.
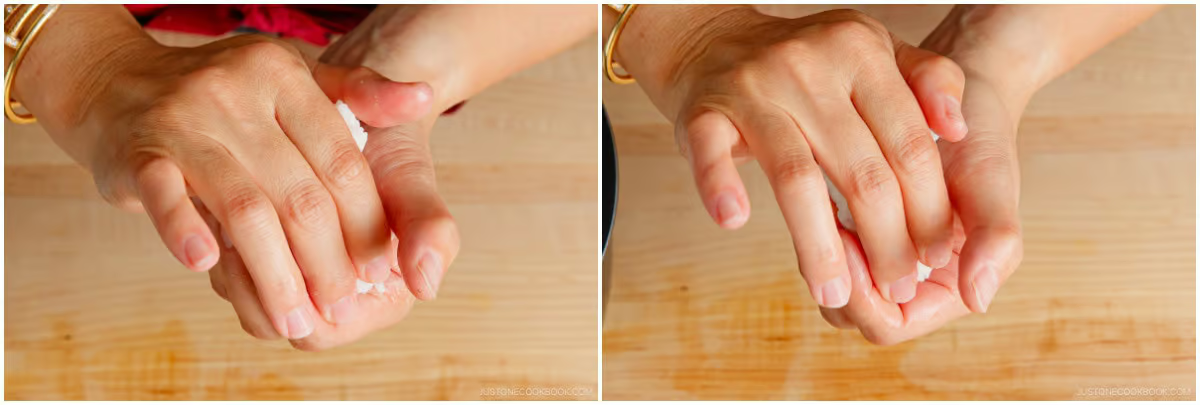
- Turn the rice ball on its side and press gently to flatten one side; repeat on the other side. Then, press and rotate one last time. Transfer to a baking sheet or plate lined with parchment paper. Repeat with the remaining rice.
Method 3: Using Plastic Wrap
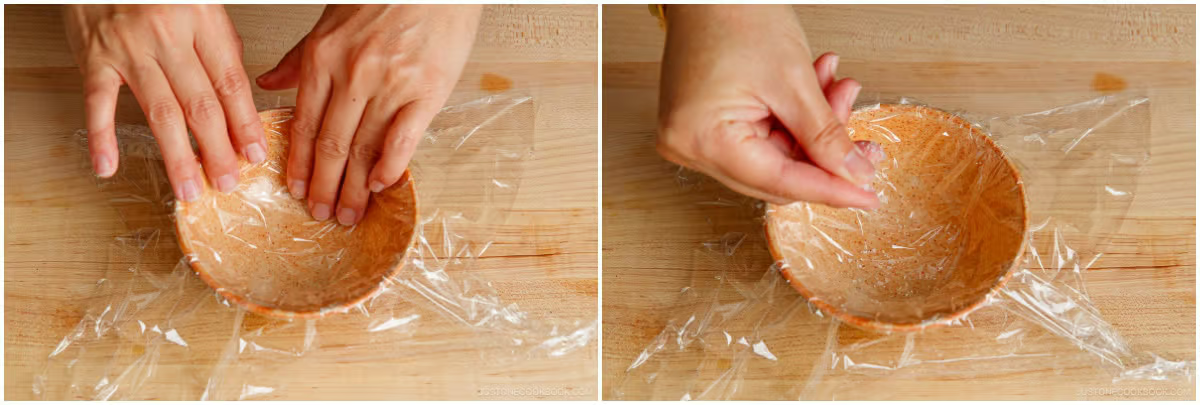
- If you don‘t want to touch the rice with your bare hands, you can use this method. Also, use this method when you are packing onigiri for lunch. Place a piece of plastic wrap in a rice bowl (or any small bowl) and sprinkle some Diamond Crystal kosher salt (remember, salt is used here to preserve the rice for a long time).
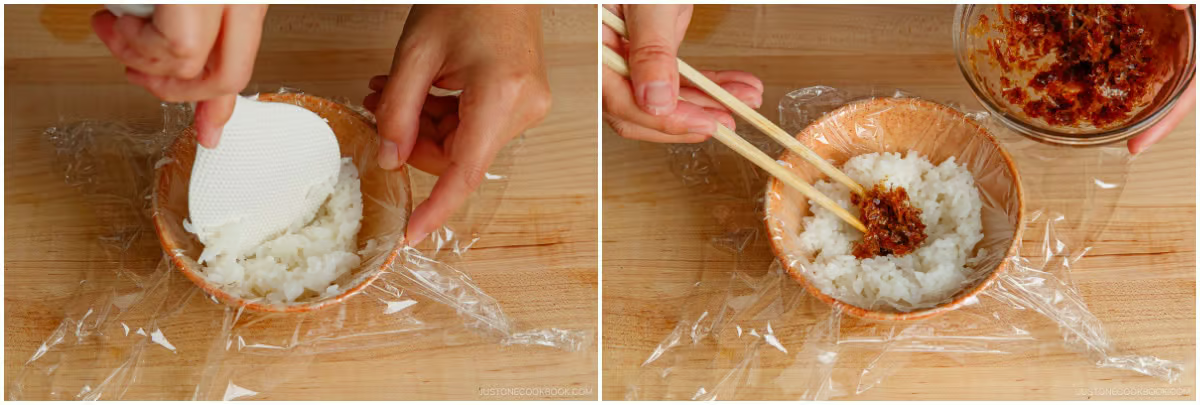
- Put the rice on top. If you‘d like to add a filling, create a small well (indentation) in the center of the rice. Put one kind of filling (about 1–2 tsp) inside.
- Then, scoop some more rice to cover your filling completely and sprinkle some salt on top.
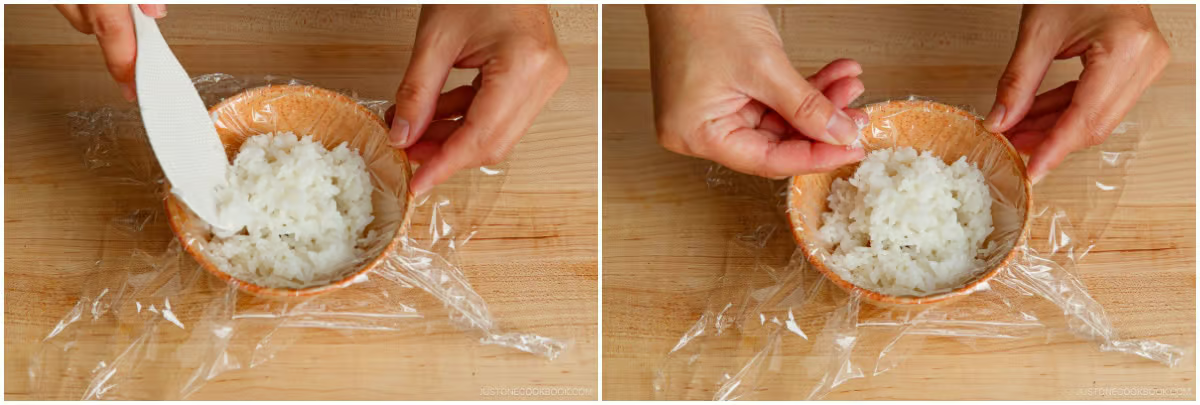
- Gather the corners of the plastic wrap and twist the plastic a few times to tighten it around the rice.
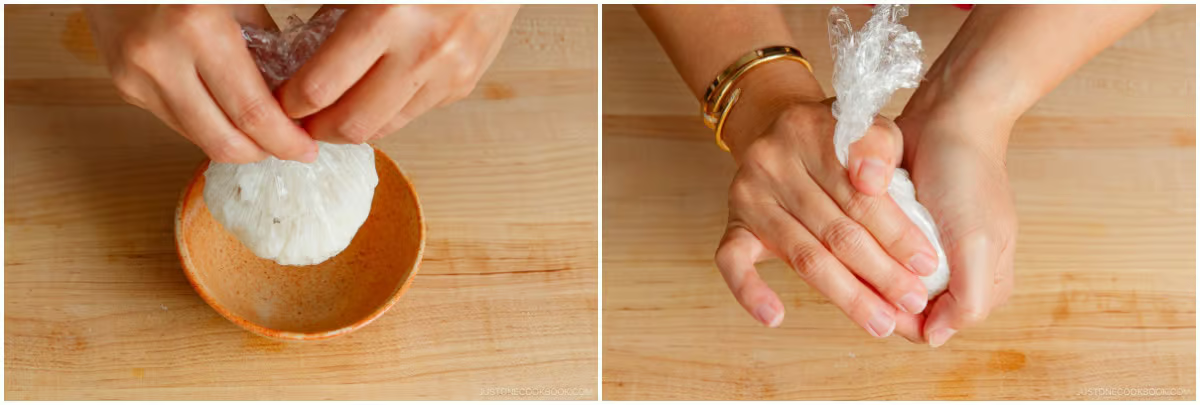
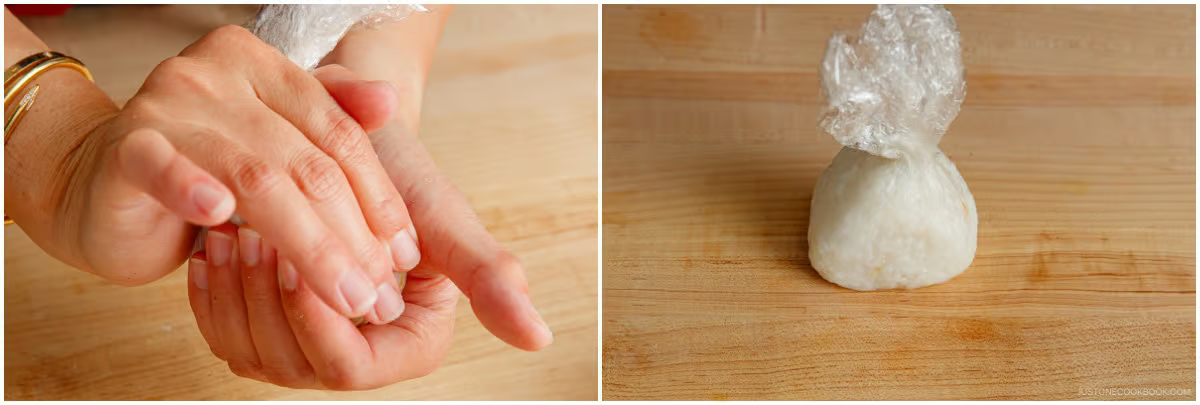
- Form the rice into a triangle shape in the same manner that I described above. Garnish with furikake and/or nori, if desired.
To Coat with the Furikake
- Remember, dip your fingers before touching the onigiri to prevent the rice from sticking to your fingers.
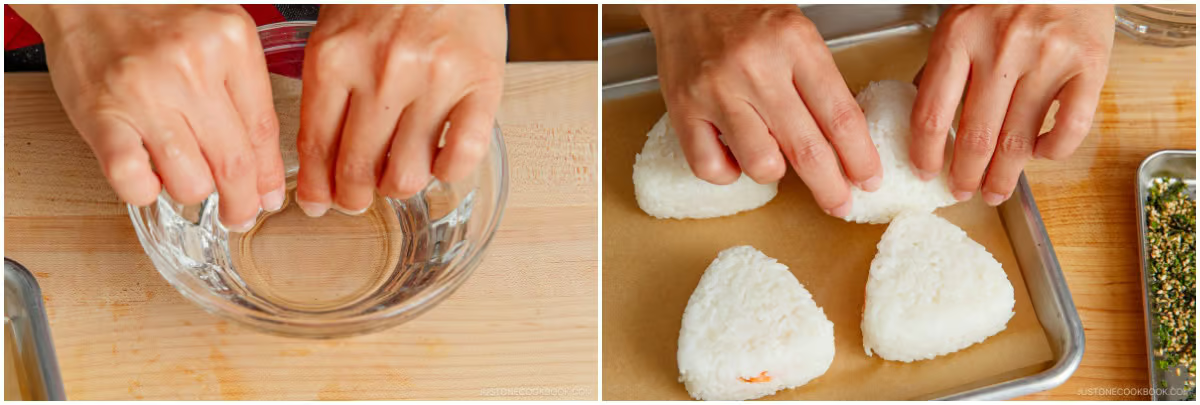
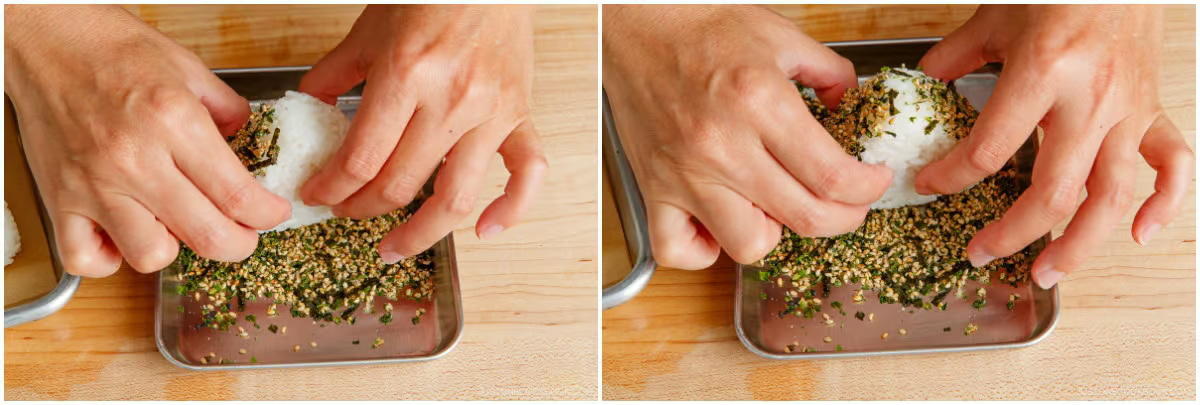
- Coat the three sides of the onigiri with furikake (rice seasoning).
To Wrap with the Nori and Serve
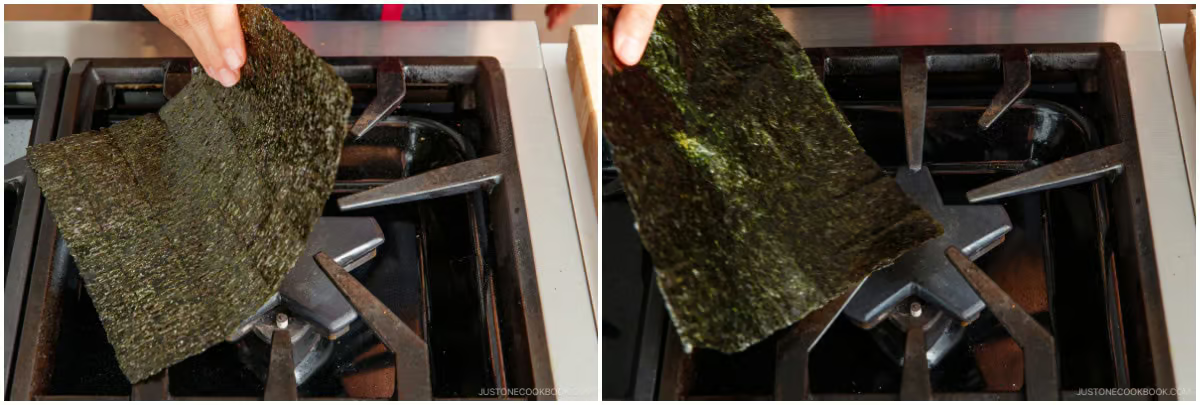
- Toast 3 sheets nori seaweed over an open flame one by one.
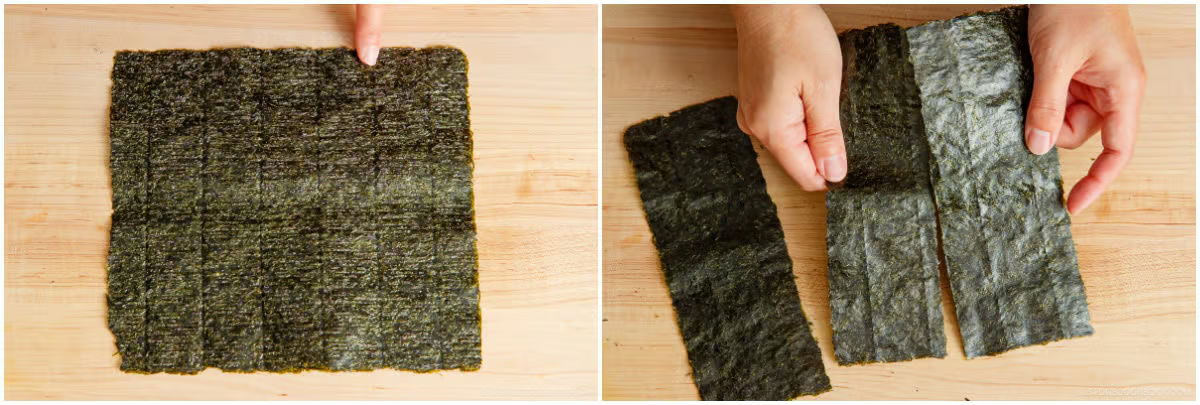
- Then, cut them into thirds, parallel to the lines on the nori sheet.
- Style A: Wrap a strip of nori on one side of the onigiri. For this style, you may need to cut the nori into shorter and narrower strips.

- Enjoy the onigiri warm or at room temperature.
- Style B: Wrap the onigiri with a piece of nori seaweed. If you like crispy nori, then wait to wrap the nori until right before consuming the onigiri. Make sure to keep the nori in an airtight container or bag so it will not get stale.
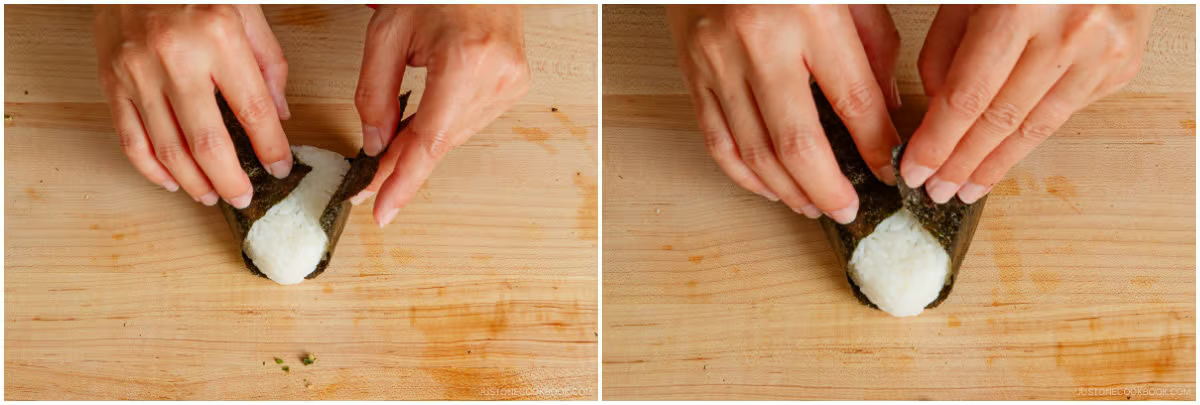
- Place a little bit of each filling on the tip of the onigiri so you can identify which filling is inside. Enjoy the onigiri warm or at room temperature.
To Store
- If you‘d like to pack Onigiri for your lunch, keep it cool and consume it within 6 hours. Onigiri (or any rice dish) gets hard when you refrigerate it. The cold air makes the rice dry and hard. I don‘t recommend making onigiri too far ahead of time. But if you really need to, my trick is to wrap the onigiri with thick kitchen towels and store it in the fridge. The onigiri will be cool and safe but should not get cold.
- If your onigiri has dried out a bit, you can grill it in a frying pan and baste it with soy sauce to make Yaki Onigiri.

Nutrition
The nutrition facts shown are generated by an online calculator and are estimates only. Please consult a professional nutritionist for specific dietary needs.
Did you make this recipe?
Tag @justonecookbook on Instagram so we can see your delicious creation!
Editor’s Note: The post was originally published on September 5, 2012. It was updated with more helpful content and new step-by-step and final images on September 10, 2023. The post was republished with a new video on May 10, 2024.